Archive | November, 2011

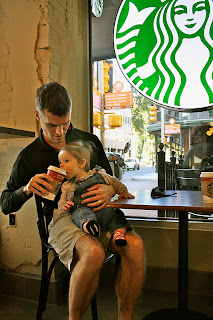
the mission to drink from a Starbucks red cup


The Starbucks red cups have been in stores since November 1 and have always heralded the start of the winter holidays for me.  This year the red cups seemed especially seasonally celebratory thanks to an email series my former roomie Sarah started to chronicle every day between Nov 1 and Dec 25 to celebrate the coming of Christmas.  She has extolled the Christmas-y joy of the red cups, and her excitement is usually infectious. Starbucks is a treat in this house, and an extra-special treat with all this build-up!

For our journey to drink from a red cup, Elliott packed some old-fashioned soft pumpkin cookies, which I made a couple of days ago with my fourth can of pumpkin so far this fall.  Here’s a photo that will hopefully make you want to come over and sip coffee with me while we discuss knitting projects and eat cookies…

(recipe included at the end of this post)

Anyway, back to our journey to Starbucks.  We decided we had to work for our rewards, so we were going to take a long walk to a large downtown Starbucks.  We set off on that chilly Thursday with Lena’s Peter Rabbit blanket tucked around her legs in the stroller.

First stop was at the San Antonio Art League Museum, which is down the street from our house.  Elliott snapped this gorgeous photo of Lena in their permanent collection upstairs.

Next we slipped into the steamy warmth of The Filling Station Café, a former car repair shop that has been transformed into a popular lunch spot.  We all read the paper while we waited for our pizza.  Reading the paper was easier for some than others.

And finally, on to Starbucks!  After a long walk, we pushed the stroller into the cozy store, interlaced our fingers behind our backs, and studied the menu.  It didn’t take long to decide.  Peppermint mochas for both of us.  Ahhh.  Christmas is coming!

Near the Starbucks is Hemisfair Park, which has a fabulous playground that reminds me of my favorite childhood playground in Australia.  We introduced Lena to slides for the first time, and she loved them!  (This was her last ride down the slid out of many, during which Elliott sent her down and I caught her, and photos were impossible to take.  That baby traveled fast.)

Here’s the recipe for the old-fashioned pumpkin cookies, which I found on this creative blog:

Old-Fashioned Soft Pumpkin Cookies

Ingredients:

  • 2 1/2 cups flour
  • 1 tsp baking soda
  • 1 tsp baking powder
  • 1 tsp cinnamon
  • 1/2 tsp nutmeg
  • 1/2 tsp salt
  • 1 1/2 cups sugar
  • 1/2 cup butter (1 stick) softened
  • 1 cup 100% pumpkin (Libby’s)
  • 1 egg
  • 1 tsp vanilla
  • Glaze (see below)
  • Optional: 1/2 cup chocolate chips or nuts

Directions:

  1. Preheat oven to 350. Grease baking sheets.
  2. Combine flour, baking soda, baking powder, cinnamon, nutmeg and salt and set aside. 
  3. Beat sugar and butter in large bowl until well blended.  Beat in pumpkin, egg and vanilla extract until smooth.  Gradually beat in flour mixture. 
  4. Drop by rounded tablespoon onto prepared baking sheets.
  5. Bake for 15 to 18 minutes or until edges are firm. 
  6. Cool on baking sheets for 2 minutes; remove to wire racks to cool completely. Drizzle glaze over cookies.

For Glaze

Combine 2 cups powdered sugar, 3 tablespoons milk, 1 tablespoon melted butter and 1 tsp vanilla in small bowl until smooth.
6 :: in eat this, family, holidays, Lena, Texas

drop everything and bake!

I am ready to open my fourth can of Libby’s pumpkin this fall, and I haven’t even baked a pumpkin pie yet.  Mostly this is because I have made… oh, let me count… five loaves of pumpkin bread.  I think it’s five.  Maybe it’s six.

Anyway, I wanted to share the recipe with you, as well as a few photos to inspire you.  I found the recipe on a sweet little blog called Tulips & Flightsuits, which is authored by a fellow UVA grad.

Ready to start baking?  First make sure your baby is content playing on the kitchen floor.  Check!

Then assemble your ingredients.  Admire your KitchenAid mixer, which might be the property of the house you’re renting (my case) or might actually be yours (your case?).  Enjoy it’s power, beauty, and capabilities as you progress.

Crank open that can of pumpkin.  Mmmm…

 Whoops, baby isn’t happy on the floor anymore.  Try to finish baking while resting her on one hip.  Your picture-taking capabilities will probably slack off at this point.

Towards the end of your mixing, add my secret ingredient: chocolate chips.  This makes the finished product so much better, in my opinion!  It doesn’t make it so much better in my hubby’s opinion, though, so I make one loaf with and one loaf without chocolate chips, and the whole family’s happy.

(Note: It is very hard to take a good picture with a DSLR camera while dumping something into your mixing bowl!  This blurry picture was the best out of five photos, and it’s hard to take even that many while dumping a single cup of chocolate chips.  How do all the cooking blogs do it?  I guess it’s called a tripod?)

Spread into a 9×5-inch baking pan.  (If you use smaller bread pans you will probably be able to get two loaves out of one batch.)

An hour later, viola!  Delicious chocolate chip pumpkin bread.

Make your second loaf without the chocolate chips, slice, and arrange on a plate.  Take along to a women’s Bible study.  Bring an empty plate home, guaranteed.

{Chocolate Chip} Pumpkin Bread

Ingredients

  • 1 1/4 cup pumpkin pie puree (Libby’s)
  • 1/2 cup canola oil
  • 3/4 cup granulated sugar
  • 1/2 cup maple syrup
  • 1 teaspoon vanilla extract
  • 2 cups all-purpose flour
  • 1 1/2 teaspoons baking powder
  • 1/2 teaspoon baking soda
  • 3/4 teaspoon kosher salt
  • 2 teaspoon ground cinnamon
  • 1 teaspoon ground nutmeg
  • 1 teaspoon ground ginger 
  • 1 cup semisweet chocolate chips

Directions

  1. Heat oven to 350° F. Grease a 9-by-5-inch loaf pan.
  2. In a large bowl, combine the pumpkin pie filling, oil, sugar, syrup, and vanilla. 
  3. In a separate bowl, combine the flour, baking powder, baking soda, salt, cinnamon, nutmeg, and ginger. 
  4. Slowly stir the flour mixture into the pumpkin mixture.
  5. Add chocolate chips if so desired. 
  6. Pour into the prepared pan. Bake for 60 to 65 minutes. 
  7. Transfer pan to a wire rack for 10 minutes. Using a knife, loosen the bread from the pan. Serve warm. 
4 :: in eat this, Lena

drop everything and bake!

I am ready to open my fourth can of Libby’s pumpkin this fall, and I haven’t even baked a pumpkin pie yet.  Mostly this is because I have made… oh, let me count… five loaves of pumpkin bread.  I think it’s five.  Maybe it’s six.

Anyway, I wanted to share the recipe with you, as well as a few photos to inspire you.  I found the recipe on a sweet little blog called Tulips & Flightsuits, which is authored by a fellow UVA grad.

Ready to start baking?  First make sure your baby is content playing on the kitchen floor.  Check!

Then assemble your ingredients.  Admire your KitchenAid mixer, which might be the property of the house you’re renting (my case) or might actually be yours (your case?).  Enjoy it’s power, beauty, and capabilities as you progress.

Crank open that can of pumpkin.  Mmmm…

 Whoops, baby isn’t happy on the floor anymore.  Try to finish baking while resting her on one hip.  Your picture-taking capabilities will probably slack off at this point.

Towards the end of your mixing, add my secret ingredient: chocolate chips.  This makes the finished product so much better, in my opinion!  It doesn’t make it so much better in my hubby’s opinion, though, so I make one loaf with and one loaf without chocolate chips, and the whole family’s happy.

(Note: It is very hard to take a good picture with a DSLR camera while dumping something into your mixing bowl!  This blurry picture was the best out of five photos, and it’s hard to take even that many while dumping a single cup of chocolate chips.  How do all the cooking blogs do it?  I guess it’s called a tripod?)

Spread into a 9×5-inch baking pan.  (If you use smaller bread pans you will probably be able to get two loaves out of one batch.)

An hour later, viola!  Delicious chocolate chip pumpkin bread.

Make your second loaf without the chocolate chips, slice, and arrange on a plate.  Take along to a women’s Bible study.  Bring an empty plate home, guaranteed.

{Chocolate Chip} Pumpkin Bread

Ingredients

  • 1 1/4 cup pumpkin pie puree (Libby’s)
  • 1/2 cup canola oil
  • 3/4 cup granulated sugar
  • 1/2 cup maple syrup
  • 1 teaspoon vanilla extract
  • 2 cups all-purpose flour
  • 1 1/2 teaspoons baking powder
  • 1/2 teaspoon baking soda
  • 3/4 teaspoon kosher salt
  • 2 teaspoon ground cinnamon
  • 1 teaspoon ground nutmeg
  • 1 teaspoon ground ginger 
  • 1 cup semisweet chocolate chips

Directions

  1. Heat oven to 350° F. Grease a 9-by-5-inch loaf pan.
  2. In a large bowl, combine the pumpkin pie filling, oil, sugar, syrup, and vanilla. 
  3. In a separate bowl, combine the flour, baking powder, baking soda, salt, cinnamon, nutmeg, and ginger. 
  4. Slowly stir the flour mixture into the pumpkin mixture.
  5. Add chocolate chips if so desired. 
  6. Pour into the prepared pan. Bake for 60 to 65 minutes. 
  7. Transfer pan to a wire rack for 10 minutes. Using a knife, loosen the bread from the pan. Serve warm. 
Related Posts Plugin for WordPress, Blogger...
5 :: in eat this, Lena

Powered by WordPress. Designed by WooThemes